Hardwood floorings have actually long been the trademark of sophistication and sturdiness in home design. Whether you are redesigning an existing room or creating a new home, the best hardwood floor installation can significantly enhance your residential property's aesthetic appeal and value. Nonetheless, several homeowners locate themselves overwhelmed by the intricacies of this project. That's where The Full Checklist for an Effective Hardwood Floor Installment Project enters into play!
In this thorough guide, we'll walk you via every action of the wood flooring installation procedure. From planning and preparation to post-installation treatment, we have actually obtained all your bases covered. So roll up your sleeves and prepare yourself to study the nuts and bolts of hardwood flooring!
Understanding Wood Floor covering Types
1. Solid vs Engineered Hardwood: What's the Difference?
When considering wood floor setup, one essential choice is whether to select solid or engineered wood.
- Solid Wood: This type consists of 100% natural timber and is recognized for its longevity. It can be fined sand and redecorated several times, making it a favored amongst homeowners. Engineered Hardwood: Made with layers of plywood topped with a veneer of real wood, engineered hardwood is a lot more resistant to wetness and temperature level modifications. This makes it perfect for basements or locations with rising and fall moisture levels.
2. Choosing the Right Wood Species
Different wood types provide differing degrees of solidity, shade, grain patterns, and expenses:
- Oak: Popular for its longevity and traditional look. Maple: Uses a light shade and great grain. Cherry: Known for its abundant color that dims over time.
Choosing the appropriate varieties will certainly not just influence appearances however also longevity and maintenance.
Planning Phase: Prepping for Your Installment Project
3. Setting an Allocate Your Hardwood Floor Installation
Before diving into material selection and specialist hiring, determine your budget plan:
|Item|Approximated Price|| ----------------------------|----------------|| Material|$3 - $12 per sq feet|| Labor|$3 - $8 per sq feet|| Additional Products|$500 - $1,000|
Remember that purchasing high quality products might conserve you cash on repair work down the line.
4. Determining Your Space Correctly
Proper measurement is vital-- below's exactly how you do it:

5. Picking a Dependable Contractor
Finding someone that knows their way around hardwood floor installation is key:
- Check online reviews Ask pals or family members for recommendations Verify licenses and insurance
Preparation Tips Prior to Setup Begins
6. Acclimating Your Timber Flooring
Before installation, it's important to accustom your hardwood flooring:
Store your slabs in the area where they'll be installed. Leave them there for a minimum of 3 days.This enables them to adjust to humidity and temperature levels in your home.
7. Preparing the Subfloor
The subfloor have to be tidy, completely dry, and level prior to installing hardwood floors:
- Remove carpet or old flooring. Repair any kind of cracks or gaps. Ensure wetness degrees serve (below 12%).
8. Planning Setup Layout
Decide on which direction your boards will certainly lay based upon source of lights or space shape:
- Long rooms need to have boards running parallel to the lengthiest wall.
This visual technique can make spaces really feel larger than they are!
The Setup Refine: Step-by-Step Guide
9. Collecting Needed Devices and Materials
Here's what you'll need:
- Circular saw Hammer Nail gun Tape measure Level Flooring adhesive (if required)
Make sure all devices are in good functioning problem prior to starting.
10. Mounting Underlayment (If Called for)
In some cases, underlayment helps with insulation and audio absorption:
Roll out underlayment throughout the whole subfloor. Overlap joints by around 6 inches.This step can be critical if you're dealing with sound issues!
11. Starting Your Initial Row
Begin putting down your first row along the lengthiest wall:

Proper placement here sets you up for success later on on!
12. Continuing with Succeeding Rows
As you lay subsequent rows:
Stagger joints by at the very least 6 inches. Use touching blocks to guarantee limited joints without harmful edges.A little additional treatment now will certainly pay off later pertaining to aesthetics!
13. Last Row Adjustments & Trimming Edges
You could require to trim your last row due to space restraints:
- Measure carefully!
Simply cut items as needed while maintaining expansion voids along walls.
Finishing Touches After Installation
14. Installing Baseboards & Trimwork
Once your floor covering is set up:
Reattach baseboards around perimeter walls. Consider footwear molding if desired for included finish.These aspects help conceal growth gaps while supplying a polished look!
15: Cleaning Up Post-installation Messes
After setup comes clean-up! Here's just how to tackle it efficiently:
Vacuum extensively to eliminate dirt from cuts. Wipe down surface areas with a damp fabric to catch any leftover debris.A tidy space not only looks better but likewise really feels fresh!
Post-installation Treatment: Preserving Your New Floors
16: Routine Cleaning Tips for Hardwood Floors
Keeping those floors looking beautiful requires routine upkeep:
Sweep daily with a microfiber mop. Use appropriate cleaners developed particularly for hardwood.Avoid rough chemicals that can remove finishes!
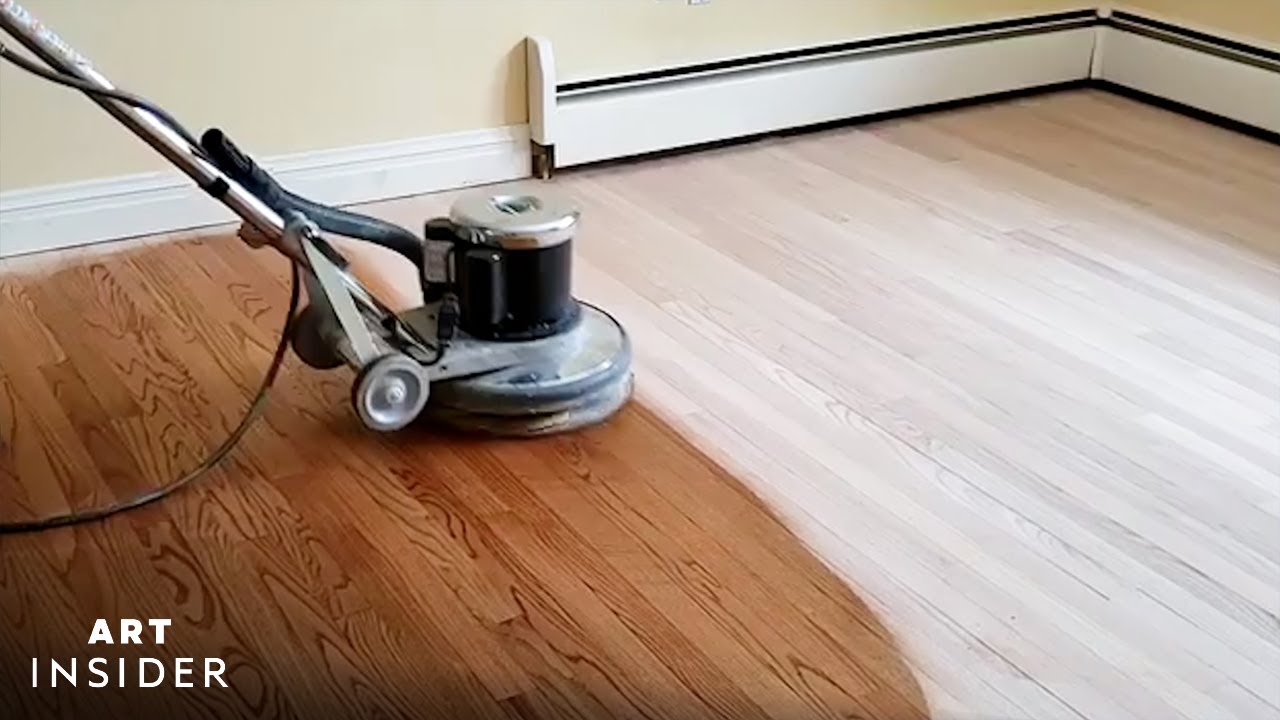
17: When Should You Refinish Your Hardwood Floors?
Over time-- even with proper upkeep-- your floorings may need refinishing:
Signs include:
- Dullness regardless of normal cleaning Scratches that come to be more noticeable
Refinishing can breathe new life into worn-out floors!
FAQs Concerning Wood Flooring
18: How Long Does Wood Floor Setup Take?
Typically, an entire installment task takes anywhere from eventually up to https://felixlmua016.wpsuo.com/top-patterns-in-hardwood-flooring-installation-for-2024 numerous days relying on area size and complexity of layout.
Answer: Typically speaking, most installments can be completed in regarding someday; nevertheless, it relies on aspects like dimension of location being covered in addition to any kind of preparatory work called for ahead of time such as getting rid of old floor covering or making subfloor repairs.
19: Can I Install Hardwood Floors Myself?
While do it yourself installations are possible if you come in handy with devices; working with experts ensures high quality job will conserve headaches later on down road particularly when dealing things like leveling subfloors properly!
Answer: Yes! If you're skilled sufficient in DIY tasks; nevertheless hiring pros could conserve time plus assurance quality results without hiccups throughout process.
20: What Kind of Maintenance Do Wood Floors Need?
Regular sweeping/vacuuming plus periodic mopping making use of suitable items suggested by makers makes sure longevity plus immaculate appearance over time!
Answer: Routine cleaning involves sweeping/vacuuming weekly plus damp wiping monthly using items especially designed risk-free efficient maintain wood surfaces.
21: Will certainly My Family Pets Damages My Brand-new Floors?
Pets can scrape wood surfaces; nevertheless picking more challenging types such as oak or maple lessen likelihood considerable damage occurring over time while making certain recurring satisfaction throughout years!
Answer: Not always; opting harder woods decreases danger while providing strength against wear caused by claws and so on, however constantly think about having actually rugs/mats placed key areas safeguard against scratches.
22: How Can I Avoid Scrapes on My New Floors?
Using furniture pads under legs stops scratching from activity; routine cleansing likewise helps maintain dirt/grit away which adds wear as well!
Answer: Putting protective pads beneath furnishings legs integrated constant cleaning helps reduce chances scratches occurring while enhancing total aesthetics!
Conclusion
With mindful preparation, implementation, maintenance-- and perhaps even some elbow grease-- you'll have beautiful hardwood floorings that last generations! By following our extensive overview titled "The Complete Checklist for an Effective Wood Flooring Installation Job," you're bound to enjoy both aesthetic charm alongside practical advantages used through long lasting premium products selected sensibly customized details needs choices personal design options made throughout entire process-- from first choices right through finished product delivered objective attained effectively understood desires come true within homes live love prosper together happily ever after!